title: “标题内容”
date: 文章创造时间
image: 封面图片
categories:文章分类
tags:文章添加标签
draft: true 表示为草稿文件,正式发布前需将值修改为 false,或者直接删除 draft 整个参数,否则正式发布时不会生成文章。
简介
为啥采用hugo,不采用hexo框架?
问题很好,没办法解释,两个框架都使用过,个人感觉hexo在主题上更丰富些,hugo在维护上更方便点,所以还是用回了hugo
文章搬运再修饰了脚本控制部分 : https://letere-gzj.github.io/hugo-stack/ (啥?喷我搬运!人家已经写得非常好了,艺术品欣赏就好何必自己欺骗自己说是自己的呢🤡)
环境准备
安装git
- 前往【Git官网】,下载安装程序
- 一直点下一步,默认安装即可
安装hugo
官网:The world’s fastest framework for building websites | Hugo (gohugo.io)
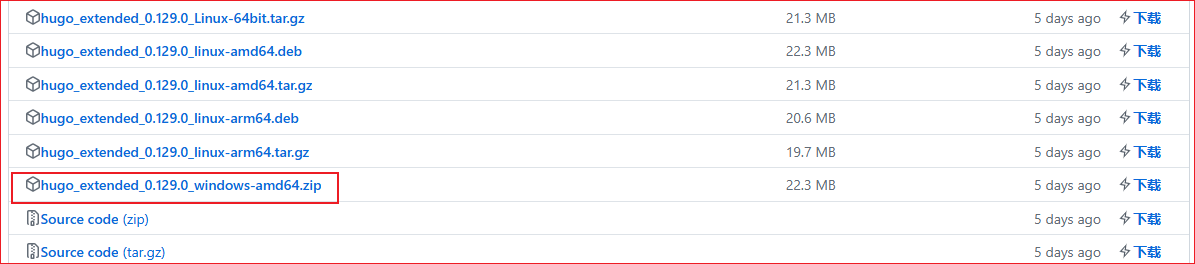
- 前往【Hugo Github Tags】,选择对应版本下载,下载后解压即可
- Windows下载版本:hugo_extended_xxxxx_windows_amd64.zip
搭建博客
创建博客
- (1)在hugo.exe所在文件夹的地址栏敲打cmd,然后Enter唤起命令行

- (2)敲打命令
hugo new site xxxx创建hugo文件

- (3)敲打命名
cd xxxx切换目录,并把hugo.exe复制到刚生成的文件夹中

目录结构:
|
|
- (4)敲打命令
hugo server -D启动服务,访问http://localhost:1313,Ctrl+C停止服务 (hugo默认是没有主题的,需要进行主题配置)


配置主题
- (1)前往【Hugo Themes】,查找自己喜欢的主题,进行下载

- (2)这边以【Stack主题】为例,将下载好的主题解压,放到
/themes文件夹中

- (3)将
exampleSite样例数据中的 Content 和 hugo.yaml 复制到主文件夹中,并删掉hugo.toml和content/post/rich-content


- (4)修改 hugo.yaml 中的 theme,将他修改为跟主题文件夹同名

- (5)再次启动hugo服务,查看主题,具体主题配置修改 hugo.yaml,这里不细说,感兴趣可自行查找相关文章

Github部署
常规部署
- (1)前往【Github官网】,创建仓库 {github用户名}.github.io

- (2)前往
Setting -> Pages -> Branch选择main分支,然后保存,会自动开启 https://{github用户名}.github.io 的地址,这地址也是以后访问博客的地址

- (3)回到hugo文件中,执行命令
hugo -D,会生成 public 静态资源文件夹

- (4)在 public 执行以下命令上传到github仓库上,第一次上传可能需要输入账号密码
|
|
- (5)上传成功后访问 https://{github用户名}.github.io,成功搭建属于自己的Hugo博客
Github Action自动部署
- (1)Github创建一个新的仓库,用于存放Hugo的主文件
- (2)前往
Setttings -> Developer Settings -> Personal access tokens,创建一个token(classic)

- (3)token选择永不过期,并勾选 repo 和 workflow 选项

- (4)为保证安全,将生成的token,保存的仓库的变量中,前往
Settings -> Secrets and variables -> Actions中设置


- (5)在hugo主文件创建一个
.github/workflows/xxxx.yaml文件,将以下内容复制进去,想具体了解更多,可查看【Github Action文档】
|
|
- (6)在hugo主文件创建
.gitignore文件,来避免提交不必要的文件
|
|
- (7)将hugo的主文件上传到仓库,上传成功后会触发Github Action,来自动部署你的静态页面
|
|

脚本控制部署
做GitHub action自动化流程控制任务时,发现上传文件的时候并不符合,既然依旧需要git push进行上传,何不用脚本来进行编写控制能,还省去一堆麻烦
shell脚本
|
|
bat脚本
Windows系统采用bat脚本,文件后缀名为.bat
|
|
音乐播放器设置
引入音乐播放器
| 名称 | 默认值 | 描述 |
|---|---|---|
| container | document.querySelector(’.aplayer') | 播放器容器元素 |
| fixed | false | 开启吸底模式, 详情 |
| mini | false | 开启迷你模式, 详情 |
| autoplay | false | 音频自动播放 |
| theme | ‘#b7daff’ | 主题色 |
| loop | ‘all’ | 音频循环播放, 可选值: ‘all’, ‘one’, ’none’ |
| order | ’list’ | 音频循环顺序, 可选值: ’list’, ‘random’ |
| preload | ‘auto’ | 预加载,可选值: ’none’, ‘metadata’, ‘auto’ |
| volume | 0.7 | 默认音量,请注意播放器会记忆用户设置,用户手动设置音量后默认音量即失效 |
| audio | - | 音频信息, 应该是一个对象或对象数组 |
| audio.name | - | 音频名称 |
| audio.artist | - | 音频艺术家 |
| audio.url | - | 音频链接 |
| audio.cover | - | 音频封面 |
| audio.lrc | - | 详情 |
| audio.theme | - | 切换到此音频时的主题色,比上面的 theme 优先级高 |
| audio.type | ‘auto’ | 可选值: ‘auto’, ‘hls’, ’normal’ 或其他自定义类型, 详情 |
| customAudioType | - | 自定义类型,详情 |
| mutex | true | 互斥,阻止多个播放器同时播放,当前播放器播放时暂停其他播放器 |
| lrcType | 0 | 详情 |
| listFolded | false | 列表默认折叠 |
| listMaxHeight | - | 列表最大高度 |
| storageName | ‘aplayer-setting’ | 存储播放器设置的 localStorage key |
- (1)在博客主目录中创建文件
layouts\partials\footer\custom.html,此文件为Stack主题作者留给我们加入自定义组件用的文件(可以查看主题源码同路径文件找到)
- (2)查看官方文档,引入对应的脚本,css到
custom.html中,页面最下面就会出现音乐播放器
|
|

- (3)修改 ap对象 配置,改成吸底模式
|
|

- (4)填写 audio 数组,引入歌曲,封面和歌词
- lrcType 的值具体看【文档】
- 歌曲,封面,歌词支持远程链接 or 本地路径
- 若想通过本地路径引入,请将资源文件放在
static文件夹下,通过hugo方法{{ .Site.Home.Permalink }},获取网站主路径来拼接文件路径,进行引入
|
|

到这一步音乐播放器已经引入完了
音乐播放器样式切换
- (1)通过阅读Stack主题的源码可以看到,主题样式的切换是通过
[data-scheme="light/darck"] {...} - (2)所以我们可以准备两种Aplayer的css,用
[data-scheme="light"]{ 亮的css样式 }包裹亮的,用[data-scheme="dark"]{ 暗的css样式 }包裹暗的,这里直接给各位准备好了- aplayer-light.scss(Ctrl+S保存)
- aplayer-dark.scss(Ctrl+S保存)
- (3)在博客主目录中创建文件
assets\scss\custom.scss,此文件为Stack主题作者留给我们加入自定义样式用的文件(可以查看主题源码同路径文件找到)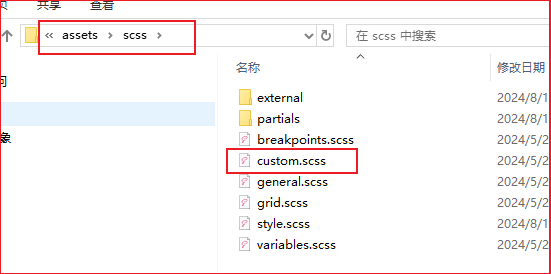
- (4)将上述两个scss文件放到跟 custom.scss同目录下,并通过
@import来进行引入文件
|
|
- (5)因为音乐播放器的css改为我们本地文件引入了,所以 custom.html 中的link标签可以将它注释掉或者删掉了
|
|

到这一步样式随主题切换已经完成了
音乐播放进度保留
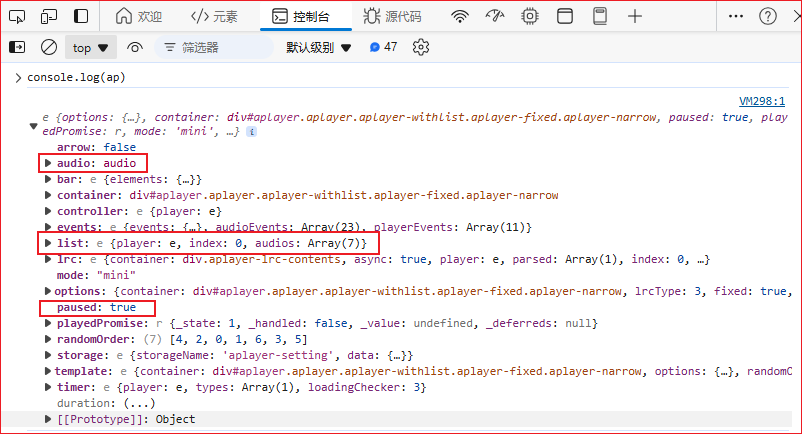
- (1)实现思路:页面切换前,把歌曲的 歌曲序号,播放时长,播放状态 记录下来;在页面切换加载完之后,我们调用Aplayer的接口切换歌曲,调整时长,并选择播放or暂停
- (2)通过
console.log(ap)打印ap对象,或者官方文档,可以找到我们需要的参数- list.index:歌曲序号
- audio.currentTime:播放时长
- paused :播放状态(是否暂停)
- (3)通过【官方文档】可以查找到我们需要调用的接口
- ap.list.switch(index: number):切换歌曲
- ap.seek(time: number):调整时长
- ap.play():播放歌曲
- (4)需要的东西已经找齐,只需在 custom.html 加入以下代码即可
|
|
引入PJAX
基本引入
- (1)PJAX主要分为两个版本,带JQuery 和 不带JQuery的,下面我演示的是不带JQuery版本的
- 【defunkt/jquery-pjax】(带JQuery)
- 【MoOx/pjax】(不带JQuery)
- (2)分析页面元素,看哪些是需要我们重新加载的,可以发现是左侧边栏,中间内容,右侧边栏
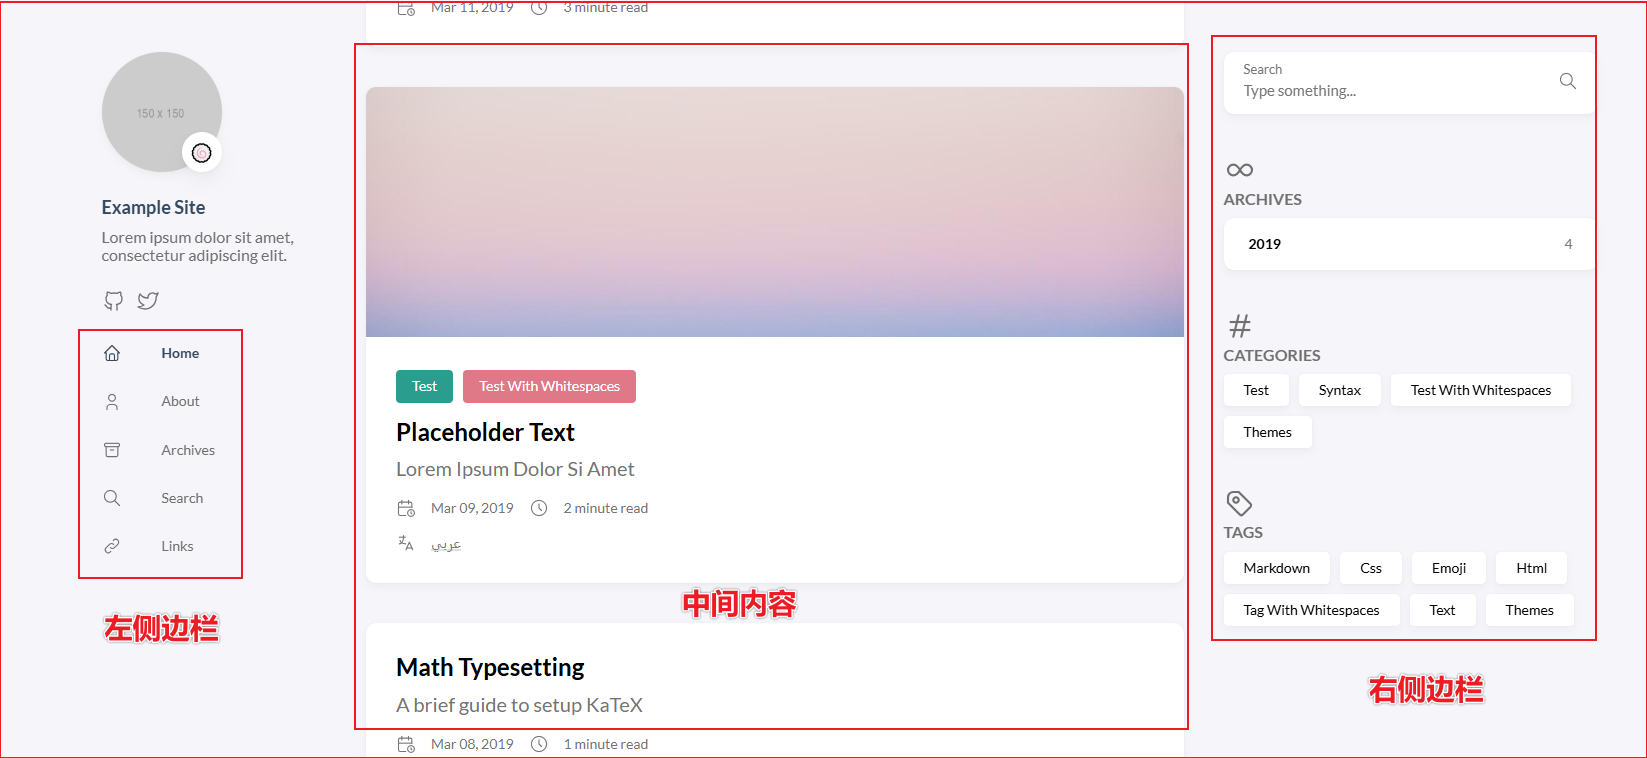
- (3)查看页面源代码,可以发现这些元素都被一个
<div class="main-container">...</div>包裹着,所以我们将着元素定为要刷新的对象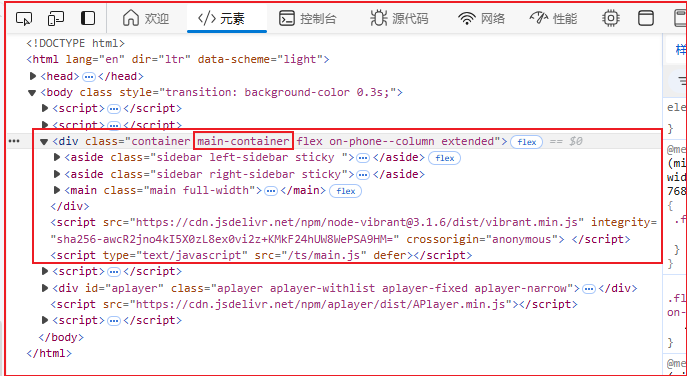
- (4)根据官方文档,在 custom.html 加入以下代码来引入PJAX
|
|
这样算是已经基本引入了PJAX,但也带来了不少问题,我们一步一步进行修复
文章样式修复
- (1)随便点进其中一篇文章,可以发现文章内容的样式丢失,缺少文章该有的边框
- (2)通过手动刷新,对比页面元素发现,决定文章样式的是
<body>标签中的class名: article-page,存在此class名就会识别到文章该有的css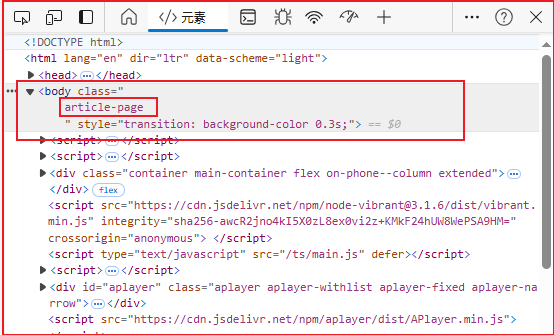
- (3)因为
<body>内包含整个页面的所有内容,包括我们的音乐播放器,所以不能让PJAX监听<body>标签- 阅读官方文档发现,官方提供了数据预处理方法,让我们处理数据
- 我们通过预处理数据,获取到新页面的className,然后我们手动将这className设置到
<body>上
|
|
这样我们切页面后,都会自动把body中的className更新,就不会丢失样式了
主题切换修复
- (1)当我们切换页面后,点击左下角切换主题颜色的按钮,会发现没有效果,主题颜色切换失效了
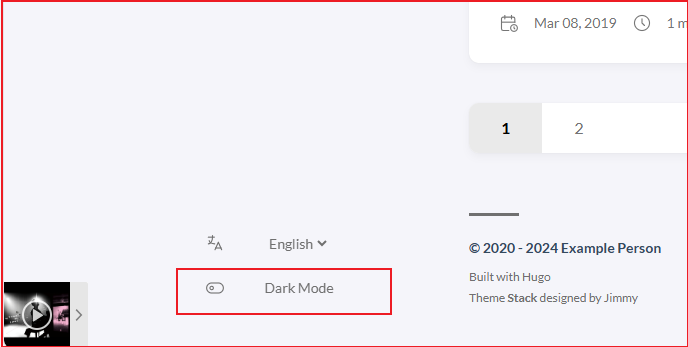
- (2)阅读Stack主题源码
\assets\ts\colorScheme.ts发现,在脚本初始化时,会给元素绑定一个点击事件。但因为页面切换了,替换了该元素,但没有该元素重新绑定点击事件,导致点击主题切换失效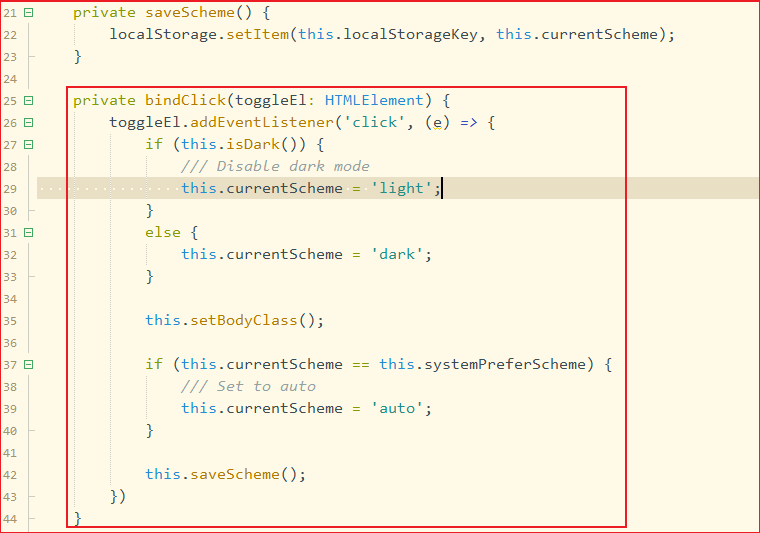
- (3)解决思路:在PJAX切换完页面后,重新执行一遍
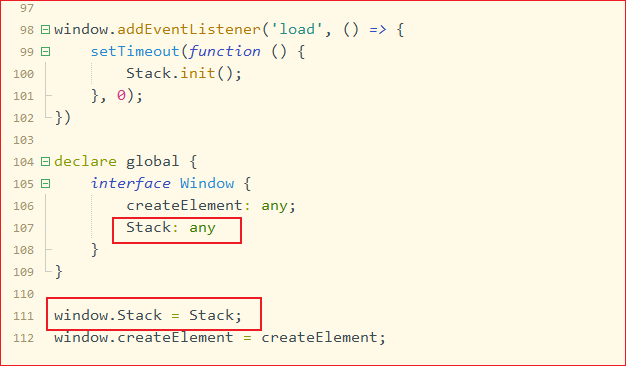
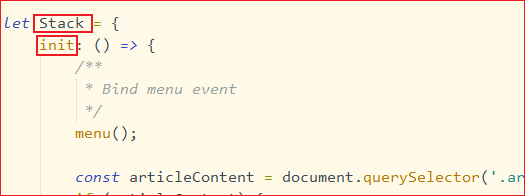
colorScheme.ts的初始化,使元素重新绑定点击事件。- 阅读源码,发现
colorScheme.ts被main.ts引用,在main.ts中执行了初始化,并且main.ts生成了个全局变量 Stack - 所以在PJAX执行完后,使用全局变量 Stack ,执行里面的初始化方法,重新执行一遍脚本,来绑定点击事件
- 阅读PJAX文档,发现官方也提供了PJAX执行完后的事件,我们执行监听这个事件,Stack 执行初始化就好
- 阅读源码,发现
|
|
这样元素的点击事件重新绑定,主题颜色就能正常切换了
文章搜索修复
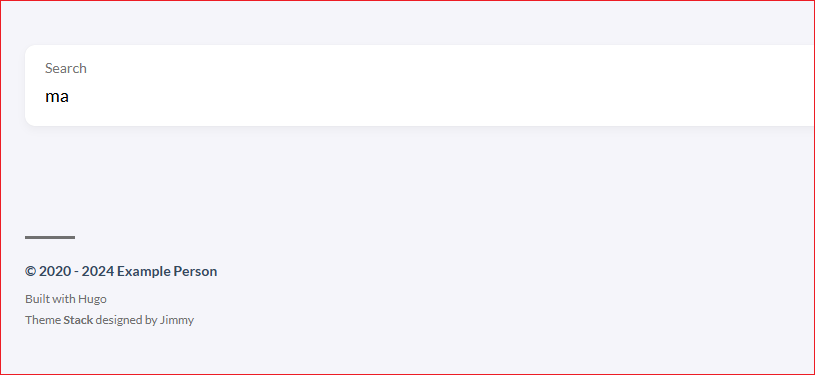
- (1)使用文章搜索功能时,输入关键词,无任何搜索记录,搜索功能失效
- (2)查看
layouts\ts\search.tsx文件,发现情况和上面的colorScheme.ts类似,存在绑定事件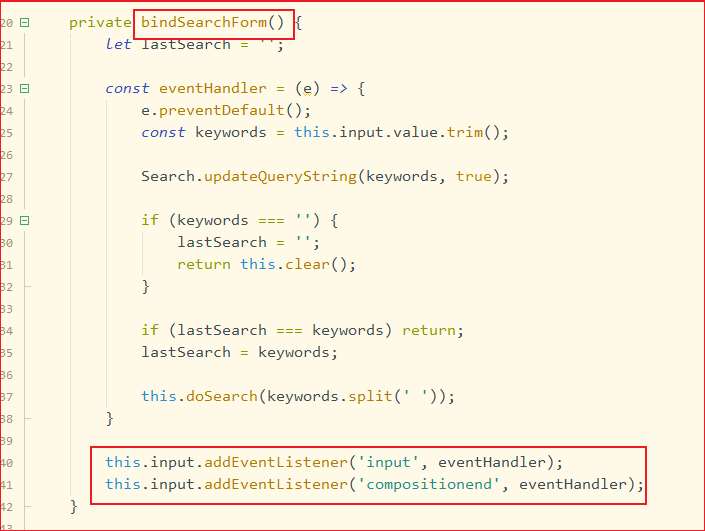
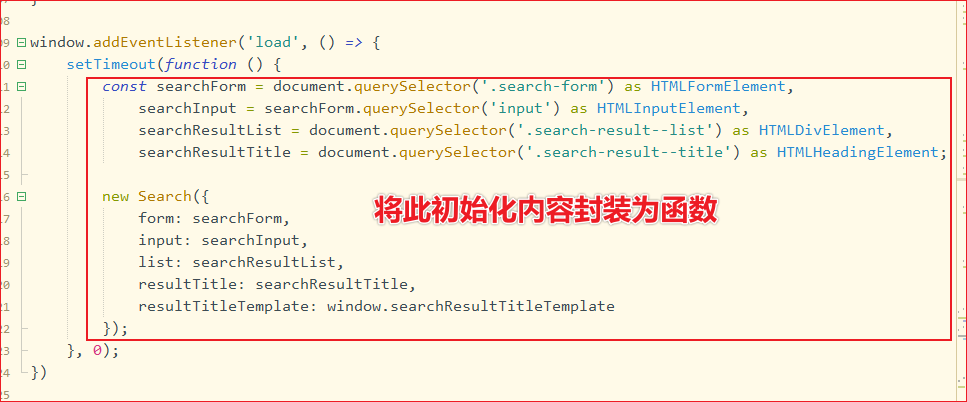
- (3)解决思路类似上面的,把 search.tsx 初始化内容,封装为一个函数,并把函数 export 出来,由 main.ts 引入这个函数,并放到 Stack.init() 的方法中,利用此方法来重新初始化搜索脚本 - (以下操作请复制同路径同名文件到自己主目录下修改,不要在主题源码中修改)
|
|
- (4)tsx 类型的文件引入方式有点特殊,需要我们修改以下 main.ts 的引入方式,修改
layouts\partials\footer\components\script.html,改法参考layouts\page\search.html,把"JSXFactory" "createElement"补充上就好


这样search.tsx能正常初始化,文章搜索功能恢复
搜索内容跳转修复
- (1)虽然文章搜索已经修复了,但搜索出来的内容并没有被PJAX识别到,导致PJAX没有拦截,进而导致页面刷新了
- (2)阅读 search.tsx 源码可知,搜索内容的数据,是通过React.render,动态渲染回页面的,这些没有触发PJAX,所以PJAX没有识别到。阅读PJAX文档,官方提供给了我们重新解析数的方法,所以在React.render之后,我调用PJAX方法,重新解析页面即可
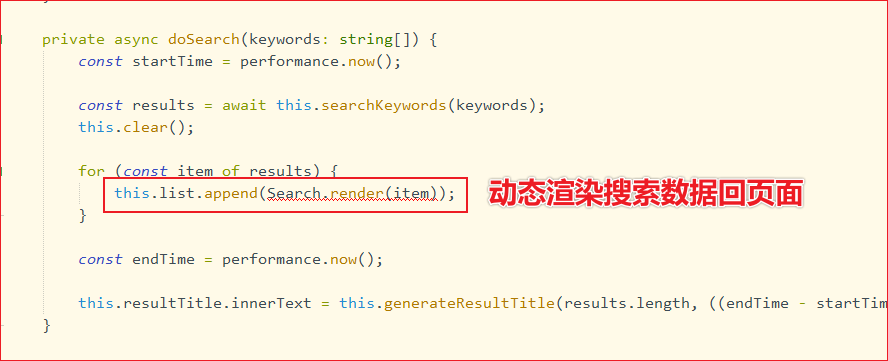
|
|
这样动态渲染出的页面数据就能被PJAX识别到,就不会刷新页面跳转了
文章评论修复
- (1)如果博客有开启评论功能的话,会发现评论的脚本不生效了
- (2)由于每个人使用的评论种类各不相同,所以这边也是简单说一下。PJAX官方文档也有说如何处理:
- 用一个
<div class=js-Pjax></div>来包裹一个<script></script> - 在
<script>标签中,通过document.createElement('script')形式,创建对应的评论脚本内容 - pjax对象通过 .js-Pjax 被识别到此内容,进行脚本执行
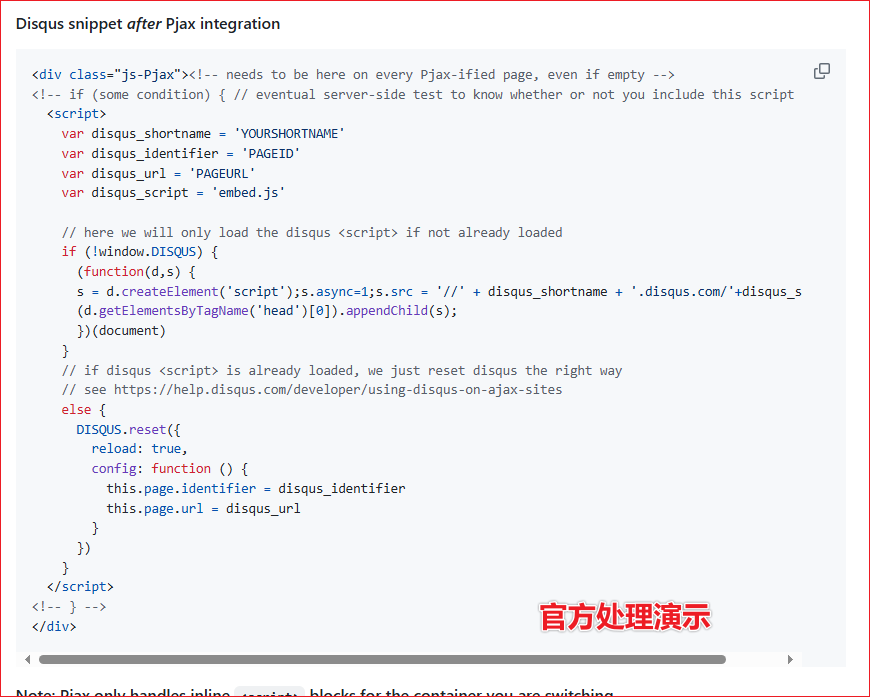
- 用一个
|
|
这样PJAX会自动加载我们的评论脚本
引入进度条
- (1)由于使用了PJAX后,无法得知页面的加载情况是否完成,所以引入一个伪进度条,来显示页面内容进度
- (2)前往【topbar】,点击下载zip包,将解压后的 topbar.min.js 放到
assets\js\topbar.min.js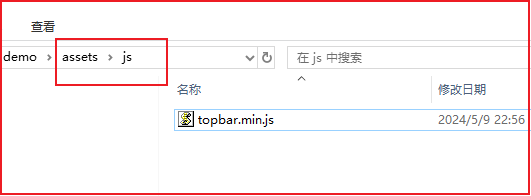
- (3)通过监听PJAX两个事件 pjax:send 和 pjax:complete 实现伪进度条
|
|

这样伪进度条就成功引入了,能大概知道页面的加载情况了